Simple 5 steps to remove frequent IP block due to mod-security in Direct admin


Simple 5 steps to remove frequent IP block due to mod-security in Direct admin

Step1: Login into the Direct admin panel user account.

Click > Domain setup

Step 2: Here Click the Domain name and click the Modsecurity option at the right side top .


step3 : Now , Here Click the option Log.


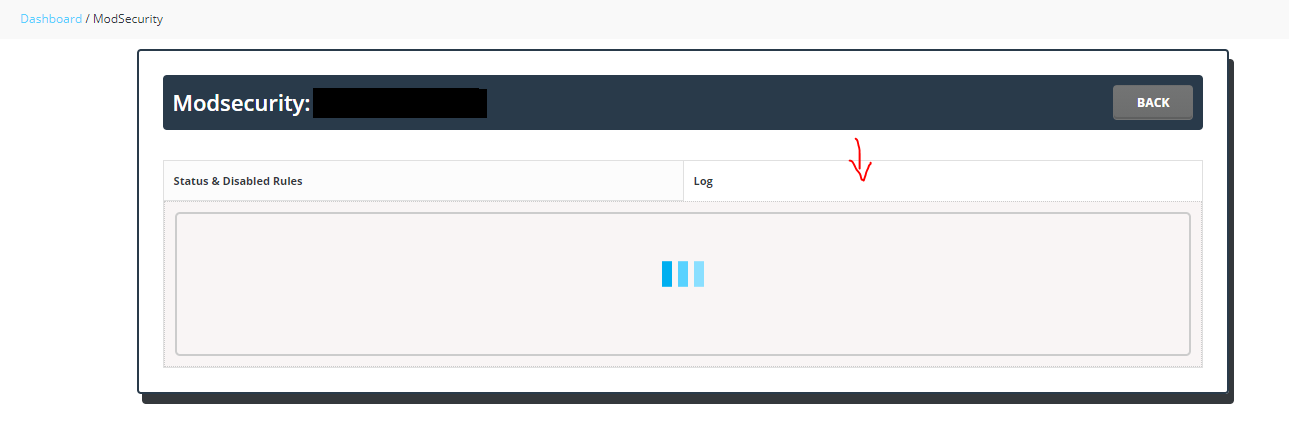
Steps4: In the  log, search with the IP .


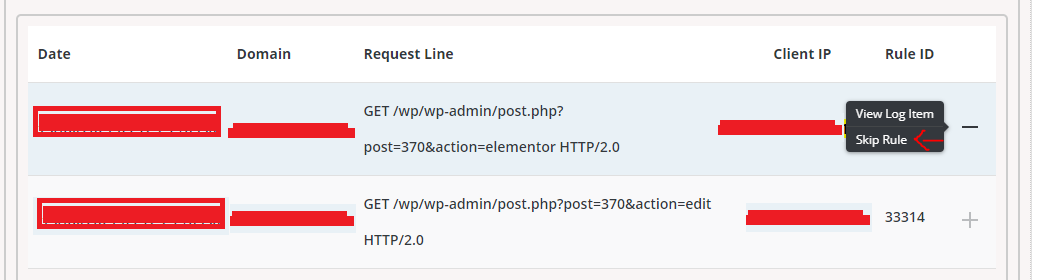
Now we can able to find the mod security rule and issue facing URL which triggers the rule.

Step 5:Click Skip rule.

Simple 4 steps for creating contact forms in WordPress

Contact forms really help the customer to interact with us by asking their queries and sharing feedbacks. Now let see the simple steps in creating a contact form in WordPress.

Steps in creating contact forms in WordPress :

Step 1:First add a contact form plugin, Here I choose ninja forms.

Once installed the plugin click activate

Step 2: Now we can able to see Ninja forms option in the left side of the panel as showing in the page,

Click that and delete the default contact form.

Step 3: Now create a new contact form.

Step 4: For adding the created contact form first we need to create a new page.

Click Pages > Add New and name the page as contact form.

Now insert the form and choose the form from the drop-down list.

So finally we have created a contact form using WordPress using the plugin.

Simple 3 steps to Remove Deceptive Site Ahead Google

Every individual managing their own website may have this feeling “How to Remove Deceptive Site Ahead for my website.


Deceptive Site Ahead

The deceptive site ahead warning simply means that attackers have compromised your site and most likely are using it for Phishing. This means the visiting users are being served fake pages that are tricking them to reveal their credentials, credit card info, and other crucial information. Which is then sent to the attackers on their shady servers.

Here are few tips that may help you to remove Deceptive Site Ahead:

Step1: Find the Cause of Infection

The first and most important step towards fixing the deceptive site ahead warning is to locate the infection. It could be present in a single page, file, folder, or the entire website.

Manual Search

While the manual search is not the ideal way for malware detection considering it requires expertise and prior knowledge to spot the malware, it can be a great start if you know your website in and out.

To start with,

  • Visit your website from another device by ignoring the warning.
  • Now, view the source of your site by right-clicking outside any element and selecting the View page source option. This will open the source code of your page in a new tab.
  • Here look for any suspicious third-party javascript files, iFrames, HTML tags, or other fishy-looking elements loading on that page. Note them down.
  • Now open the file manager of your server and view the source code of those files for malicious code.

During the manual search, some other resources that you need to check for fixing deceptive site ahead warning are:

  • Any new themes or plugins you recently installed.
  • Unknown web admins in the dashboard.
  • New admins or users in the database.
  • New files with unique names or base64 encoded characters.

To check for recently modified files, say 30 days old, log in to your server via SSH and run the following command:

find . -type f -mtime 30

Here, change the value from 30 to as per the number of days of your choice. A word of caution here, some files are automatically modified by the system so be sure to double verify for malware in such files before removing them.

Step 2: Clean the Website

Now that you have identified the infected files or hacked resources the next steps for fixing deceptive site ahead warning are:

  • Delete the malicious code in infected files. If you are unsure of what the code does, comment it out and get help from experts.
  • For code obfuscated using base64 encoding, use online resources to decode it and see what it does.
  • Remove suspicious users from the database as well as the dashboard and change passwords to each one of them to a secure and random string.
  • Delete any buggy or null plugins, themes, etc, and make sure to delete their files as well. There are plenty of alternatives available to them today that you can choose from if the plugin/theme adds important functionality to your website.
  • If any suspicious users are found in the property owner management page of your Google search console dashboard, remove them. Also, delete all meta tags and HTML files that were used to verify the ownership by unauthorized users.
  • Finally, alert the users to reset their credentials as phishing pages would have sent them to attackers.

Step 3: Submit Site for Review

The last step in fixing a deceptive site ahead warning message is to submit the website to Google for a review. However, before doing so, make sure you have double-checked your website for backdoors or malware.

If all is spick and span, submit the site for review using these steps:

  1. Login to your Google Search Console.
  2. Click and open the Security Issues report section and select I have fixed these issues.
  3. Thereafter, click on the Request a review. Here, tell in detail the steps you took in fixing the warning. You can also use custom templates provided by some sites.
  4. Finally, click Submit Request and in case there are multiple issues, repeat the process for each.
  5. When done with all, sit back and wait as this can take a few hours for Google to review your request.

If all is okay with your website, Google will lift the blacklisting and de-indexation of your pages. It can take a few days for your web pages to get re-indexed to regain their rankings entirely.

How to change SSH port number in linux

Today we are going to know about “How to change SSH port number in linux”.

1.First connect to your server via SSH using terminal emulator (PUTTY ).

2.Changing of the SSH port number has to be done in sshd_config file.

And the file “sshd_config” will be in the path “/etc/ssh/”, So we have to access the path using the cd command .


3.Now use vi editor command to edit the file “sshd_config” and press “i” change the port number.


4.Here I am using 2244 instead of the default port 22.

5.Now Save and close the file using press “ESc” key and type :wq and press enter..

6.Make sure the port is allowed in your firewall and restart the sshd service to change the ssh port in Linux.


6 Steps to gain Hacked WordPress dashboard admin access

We might have come across WordPress website infections through outdated Themes and Plugins which can be resolved by updating themes and plugins regularly. But
What if you got into a situation that your WordPress dashboard admin access removed and you no longer able to access it? How to gain Hacked WordPress dashboard admin access back.


6 Steps to gain Hacked WordPress dashboard admin access :

To gain the WordPress dashboard admin access back, we can add an Admin User to the WordPress Database via MySQL as the hacker might have removed it to restrict the access to the WordPress dashboard.

Note: Make sure you have a backup of your database before performing any MySQL edits.

1.login to your hosting control panel and go to phpMyAdmin and locate your WordPress database.


2.Once you are in, we will be making changes to the wp_users and wp_usermeta tables. Let’s go ahead and click on the wp_users tab

3.now click on the Insert tab and follow the below steps,

  • ID – pick a number ( for example 5)
  • user_login – insert the username you want to use to access the WordPress Dashboard.
  • user_pass – add a password for this username. Make sure to select MD5 in the functions menu.
  • user_nicename – put a nickname or something else that you would like.
  • user_email – add the email you want to associate with this account.
  • user_url – this would be the URL to your website.
  • user_registered – select the date/time for when this user is registered.
  • user_status – set this to 0.
  • display_name – put the name you like to display for this user on the site (it can be your user_nicename value as well).
  • Click on the Go Button

4.Next, we have to add the values to the wp_usermeta table. Click on the wp_usermeta table and then click on the Insert tab just like the previous step. Then add the following information to the insert form:

  • unmeta_id – leave it as blank it is it will generate automatically.
  • user_id – this will be the id of the user you created in the previous step..
  • meta_key – this should be wp_capabilities
  • meta_value – insert this: a:1:{s:13:”administrator”;s:1:”1″;}

5.Insert another row with the following information:

  • unmeta_id – leave it as blank it will generate automatically.
  • user_id – this will be the id of the user you created in the previous step.
  • meta_key – this should be wp_user_level
  • meta_value – 15

6.Then click on the Go button, and you have created a new username. Now you should be able to login to your wp-admin with the username and password you specified for this user. Once logged in, click on Users and edit the username you just created. Go down and click on the Save button.