
Table of Contents
Installing a free SSL certificate in Plesk control panel can be done easily using the Let’s Encrypt extension, which provides free SSL certificates. Here is a step-by-step guide to help you install a free SSL certificate in the Plesk control panel:
Step-by-Step Guide to Install Free SSL in Plesk control panel
Step 1: Log in to Plesk
- Open your web browser and go to your Plesk login URL, typically something like
https://yourdomain.com:8443. - Enter your username and password to log in.
Step 2: Install the Let’s Encrypt Extension (if not already installed)
- In the left-hand sidebar, click on Extensions.
- In the Extensions Catalog, search for Let’s Encrypt.
- If the Let’s Encrypt extension is not already installed, click Install.
Step 3: Issue a Let’s Encrypt SSL Certificate
- In the left-hand sidebar, click on Websites & Domains.
- Find the domain for which you want to install the SSL certificate.
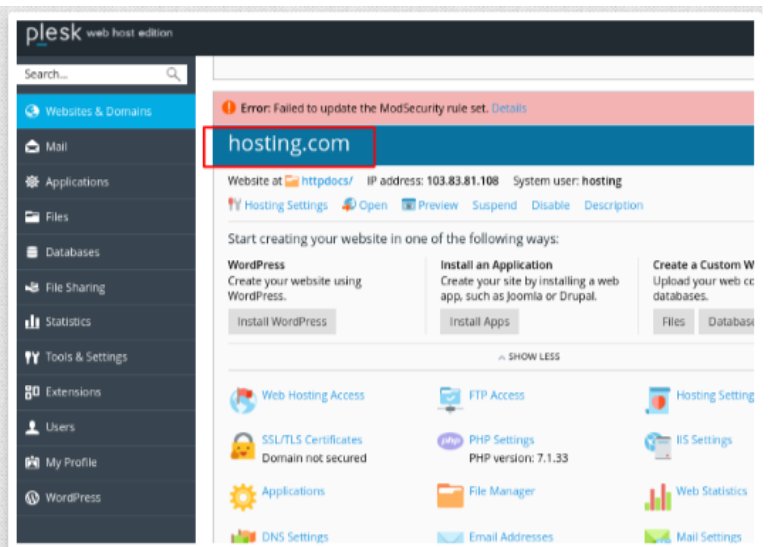
4.Click Hosting Settings.
Step 4: Go to the Security section and select the following settings:
Enable SSL/TLS support.
Enable the Permanent SEO-safe 301 redirect from HTTP to HTTPS option.
in the Certificate section, select your SSL certificate.

Step 5.Click OK.
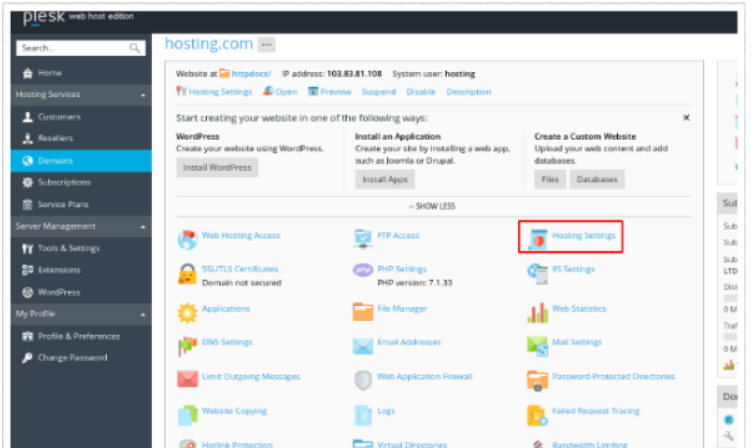
1. You will be returned to the domain you selected previously. In the Dashboard tab, select SSL/TLS Certificates.

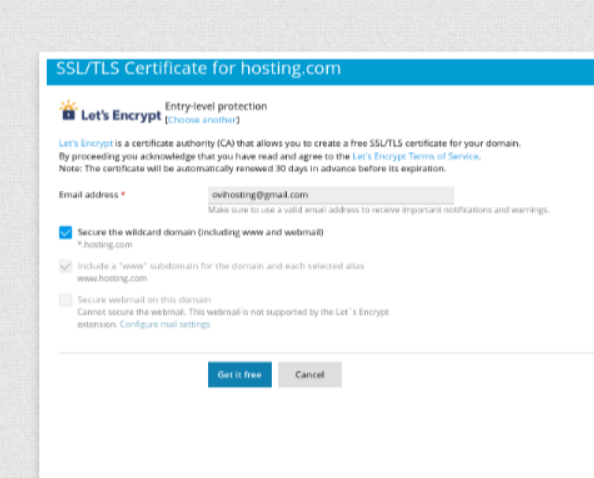
Step 6.once login ssl/tls certificate you will get Let’s Encrypt

Step 7. Please click on Get it Free

Step 8 .Enter an email address for any notifications/warnings about the certificate to be sent to
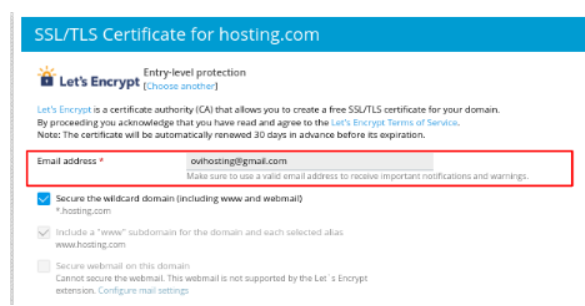
Step 9.Once enter your email address Select the tick-boxes if you want the www and webmail prefixes of the domain to be covered by the certificate.
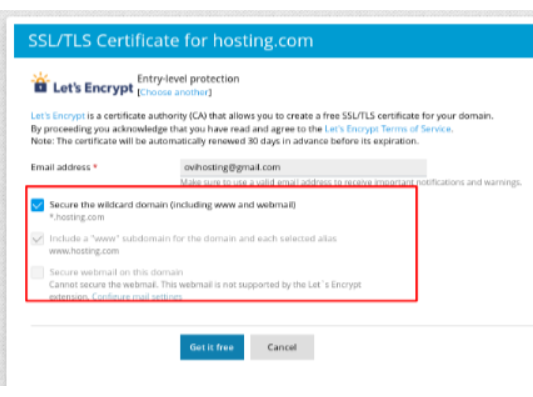
Step 9.Once enter your email address and select the Secure the Wildcard domain, please click on Get it free
Verify SSL Installation
- Once the installation is complete, Plesk will automatically apply the SSL certificate to your domain.
- To verify, go back to the Websites & Domains section.
- Click on Hosting Settings for your domain.
- Ensure that SSL/TLS support and Permanent SEO-safe 301 redirect from HTTP to HTTPS are enabled.
- Click OK to save changes.
Additional Tips
- Automatic Renewal: Let’s Encrypt certificates are valid for 90 days but Plesk will handle automatic renewals for you.
- Custom Settings: If you have custom configurations or need to install the certificate manually, you can do so through the SSL/TLS Certificates section under Websites & Domains.
- Securing Subdomains: If you need to secure subdomains, you may need to issue separate certificates for each subdomain or use a wildcard certificate if supported.
Troubleshooting
- DNS Issues: Ensure that your domain’s DNS settings are correctly configured and that your domain is pointing to the Plesk server.
- Firewall Settings: Make sure that the Plesk server can communicate with the Let’s Encrypt servers. Check firewall settings if necessary.
- Email Verification: Make sure the email address provided during the Let’s Encrypt setup is valid and accessible, as it is used for important notifications.
By following these steps, you can easily install a free SSL certificate for your domain in the Plesk control panel, providing secure, encrypted connections for your website visitors.